|
Did you know that you can automate the video recording of website tests using the Chrome plugin, HYFY.io?
Here are instructions: https://www.hyfy.io/automate To set up Selenium, you my need to review this post about how to add a browser plugin: https://installselenium.weebly.com/blog/install-a-chrome-plugin-in-selenium. For another code sample in Selenide: https://github.com/jpratt2/CucumberTemplateJava. This demo has a short example for Java and Maven: Sample code for setup:
 ChromeOptions options = new ChromeOptions()
        //add this folder as a Chrome extension:   chromeExtensions\HYFY\kfhkikpdmehlpkaiplafjkaicdljldcf\3.26.0_0
        .addArguments("load-extension=" + System.getProperty("user.dir") + File.separator + "chromeExtensions" + File.separator + "HYFY" + File.separator + "kfhkikpdmehlpkaiplafjkaicdljldcf" + File.separator + "3.26.0_0")
        .addArguments("--whitelisted-extension-id=kfhkikpdmehlpkaiplafjkaicdljldcf");
    WebDriver driver = new ChromeDriver(options);
Code to start recording:
        driver.get("chrome-extension://kfhkikpdmehlpkaiplafjkaicdljldcf/index.html#/start-recording");
        WebElement firstButton = driver.findElement(By.tagName("button"));
        firstButton.click();
0 Comments
Here is a demo of an older version of screencastify that uses the keystrokes Alt + Shift + R to start and stop video recording. It also needs a username and password to log in to Google Drive to save the videos. Enter your username and password in the screencastifyDemoTests.java file.
Because it uses keystrokes via the Robot class, it is imperative that no other work be done simultaneously with the test. The focus has to remain unchanged in order to start and stop the recording. Sample code:
    @Test
    public void testVideo() {
        loginGoogle(driver);
        startRecorder(driver);
        driver.get("http://bit.ly");
        driver.get("http://libreoffice.org");
        driver.get("http://mzl.la");
        stopRecorder(driver);
    }
This Selenium test allows you to open multiple URLs in Chrome, each in its own tab, and it clears cookies between each URL. It requires a little manual setup:
To use: just manually update the URL list in the openMultipleURLTest file. Note:
This demo requires Maven and is designed for windows.
There are 2 ways to add a Chrome plugin to a Selenium test:
options.addExtensions(new File("/path/to/extension.crx")); options.addArguments("load-extension=/path/to/extension"); The second is preferable due to preserving resources (to prevent unpacking the crx file), which will prevent "out of memory" errors for large extensions. The sample code offered at https://sites.google.com/a/chromium.org/chromedriver/extensions can be simplified further:
ChromeOptions options = new ChromeOptions();
options.addArguments("load-extension=C:\\Users\\user\\...");
WebDriver driver = new ChromeDriver(options);
driver.get("http://website.com");
Here is code to consider to use a subfolder called "chromeExtensions" in the main test folder:
options.addArguments("load-extension=" + System.getProperty("user.dir") + File.separator + "chromeExtensions" + File.separator + "screencastify");
The hardest part might be getting an unpacked version of the plugin. Here are 2 options:
1. Copy the extension folder from the Chrome profile.
2. Download the .crx file and unzip it For #1, you can visit chrome://version to obtain the path to the profile. You will find an extension folder that will match the name of the key found in the chrome plugin url, for example: https://chrome.google.com/webstore/detail/screencastify-screen-vide/mmeijimgabbpbgpdklnllpncmdofkcpn has this name: mmeijimgabbpbgpdklnllpncmdofkcpn. For #2, you may want to consider chrome-extension-downloader.com for the download and 7-zip.org to unzip it.
To run a test remotely at browserstack.com, here is their demo code with a few modifications for the maven/junit format:
import org.openqa.selenium.remote.DesiredCapabilities;
import org.openqa.selenium.remote.RemoteWebDriver;
import java.net.URL;

import org.junit.*;
import org.openqa.selenium.*;
import com.codeborne.selenide.*;
import static com.codeborne.selenide.Selenide.*;
import static com.codeborne.selenide.CollectionCondition.*;
import static com.codeborne.selenide.Condition.*;
import org.junit.runners.MethodSorters;
@FixMethodOrder(MethodSorters.NAME_ASCENDING)


public class browserstackTest{

    public static final String USERNAME = "yourname";
    public static final String AUTOMATE_KEY = "yourkey";
    public static final String URL = "https://" + USERNAME + ":" + AUTOMATE_KEY + "@hub-cloud.browserstack.com/wd/hub";

    @Test
    public void main() throws Exception {

        DesiredCapabilities caps = new DesiredCapabilities();
        caps.setCapability("browser", "Chrome");
        caps.setCapability("browser_version", "62.0");
        caps.setCapability("os", "Windows");
        caps.setCapability("os_version", "10");
        caps.setCapability("resolution", "1024x768");
        caps.setCapability("browserstack.networkLogs", true); //browserstack.networkLogs=true;

        WebDriver driver = new RemoteWebDriver(new URL(URL), caps);
        driver.get("http://www.google.com");
        WebElement element = driver.findElement(By.name("q"));

        element.sendKeys("BrowserStack");
        element.submit();

        System.out.println(driver.getTitle());
        System.out.println("*************************************");
        driver.quit();

    }
}
Browserstack automate offers videos of the selenium test, network logging (but it lengthens the test duration), and most of all -- detailed browser specification. This example specified Chrome on Windows 10 with a screen size of 1024x768. More info
For the IE 11 error "Protected Mode settings are not the same for all zones. Enable Protected Mode must be set to the same value (enabled or disabled) for all zones." you can fix this in "Internet Options" in the "Security" tab: 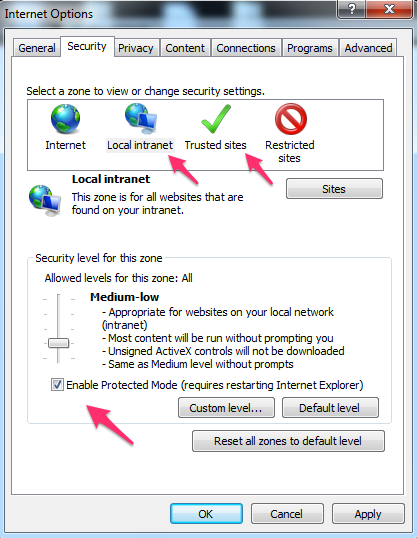 |
